September 23, 2017
This is the sixth step in the “How To Make A 90-Second Newbery” series. If you haven’t already, check out Step 1: Watch Grat Previous 90-Second Newberys and Step 2: Read The Book And Start Planning, Step 3: Breaking The Story And Writing The Script, Step 4: A Crash Course In Cinematography, and Step 5: Top Mistakes To Avoid.
All right, you’re ready to rock! You’ve watched lots of great 90-Second Newbery videos to get inspired (Step 1). You’ve read your Newbery-winning book, figured out your unique take on the material, and marshaled your resources (Step 2). You’ve broken the story and written an amazing script that fulfills your twist and tells a complete (if condensed) version of the story in a way that makes sense (Step 3). You’ve learned the basics of cinematography (Step 4) and you’ve taken steps to avoid the classic mistakes of many 90-Second Newbery movies (Step 5).
You’re ready to shoot that movie!
But maybe you’ve never made a movie before. You may have a great script, but what if everything falls apart when you’re actually shooting the movie? Or what if you bungle editing it? Maybe you don’t know how to frame a shot, you don’t know how to move the camera, and you’ve never used video editing software. There’s too much to know! It can feel overwhelming!
Relax. You’ve been watching TV and movies all your life. You already have all the knowledge you need inside you. All I need to do is remind you of that knowledge.
To do that, let’s analyze the very first 90-Second Newbery movie, of Madeleine L’Engle’s 1963 Medal winner A Wrinkle in Time.
As you watch the movie below, pay attention to where the camera is placed. I’m going to be talking a lot about how to compose your shots. It doesn’t cost any extra money to put your camera in the right place. And the difference between a movie that is well-shot, and a movie where the camera is just carelessly plopped around anywhere, is crucial. There’s a whole cinematic vocabulary that can help you tell your story. (I explain a lot of it in Step 4: A Crash Course In Cinematography.)
Also, pay attention to the sound. Sound is one of the most powerful tools a filmmaker has. But this powerful tool is often ignored by beginners because they assume a movie is all about the moving image. On the contrary, the difference between a good or bad movies often comes down to sound design.
After we watch the movie, I’ll examine it shot by shot and and point out techniques that you can use to make your own movie—telling the story not only through spoken dialogue, but also with camera angle, shot choice, transitions, sound effects, and special effects.
Let’s jump in and watch the movie first:
Not bad, huh? Some great acting. Told the complete (abbreviated) story. Only 90 seconds long, if you don’t count the credits. Even a few fun special effects and sound effects. And the whole thing was shot on an old 2010-era flip camera no bigger than an iPhone. (You don’t need fancy equipment.)
Now let’s analyze that movie shot-by-shot, and understand the decisions that made it effective.
Shot #1: Meeting Meg
- Introduce the hero ASAP. We know the hero’s name and her situation in the first few seconds. Of course not every 90-Second Newbery movie should start exactly this way. But you should always try to establish the hero very quickly.
- Pay attention to color. If you happen to be shooting a scene indoors, try not to shoot with white walls in the background. These green walls make a better background than white walls, and they complement Meg’s blue sweater nicely. The splashes of red throughout make for an interesting contrast.
- You can use sound effects in the background. Do you think it was really raining outside when they shot this? Of course not. That’s just a thunder-and-rain sound effect from iMovie’s built-in library of free sound effects. Notice how the rain sound effect continues without interruption past the cut into the next shot and through the few shots after that.
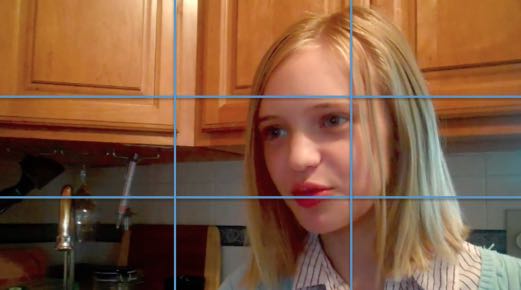
Shot #2: Meeting Charles Wallace

|
- The Rule of Thirds. I added those blue grid lines over the shot to illustrate the famous “Rule of Thirds.” That is: When you’re holding the camera, imagine invisible grid lines that divide the frame into nine equal sections like you see here. Our eyes are naturally drawn to those invisible lines—and our eyes are very much drawn to where those invisible lines intersect. So if something important is happening in your shot, make sure it’s happening on one of those lines, or where the lines cross. Here two lines intersect on Charles Wallace’s head, which makes sense because he’s the most important thing in this shot.
- Make sure you have props. Charles Wallace’s line “I made hot milk and a sandwich” works much better because he is literally holding milk and a sandwich. Use props whenever you can. Give your characters objects to hold and manipulate, to give and take. This adds visual interest.
- Angling the camera “down” on someone makes them look younger, more powerless, more submissive. The boy who plays Charles Wallace here is ten years old. But the actual character of Charles Wallace is only four years old! How do you make a ten-year-old look younger? It turns out that if you hold the camera such that it is “looking down” on someone, this has the effect of diminishing the subject, making them appear less powerful, less significant, even younger. Also, if you want to shoot someone looking scared or submissive, do a “high angle” shot like this.
- Consistent background sound can “connect” scenes. Even though the scene has changed, the rain-and-thunder sound effect from the previous shot has continued uninterrupted, which subtly indicates to us that we’re around the same location at the same time. It’s not the next day or hours later.
Shot #3: Meg responds to Charles Wallace
|
- Angling the camera “up” at someone makes them look older, more powerful, more dominant. To emphasize that Meg is older than Charles Wallace, we shoot her from (ever-so-slightly) below. If the camera is “looking up” at someone, it has the effect of making them look more powerful, more intimidating, and older. If you want to shoot someone looking scary or threatening, do this kind of “low angle” shot (but more extreme than this).
- In a scene of two people talking to each other, have each of them stay on “their” side. Throughout this conversation, as we cut back and forth, Charles Wallace stays on the left and Meg stays on the right. It would be spatially confusing if Charles Wallace said something while looking to the left, and then we cut to Meg responding while also looking to the left. In general, if two characters are interacting in a scene, imagine an invisible line between them and keep the camera on one side of that line throughout the scene. This is called “The 180 Rule.” Note: if you want to get a “jarring” effect (let’s say there was an explosion and both characters suddenly react), go ahead and break this rule.
- Get out of your classroom and into a real location. I get a lot of 90-Second Newberys in which the whole thing is shot in a classroom or school hallway or a corner of the library. Those are fine, but it’s much more effective to try to shoot at the right location. This scene in the book is set in an ordinary kitchen at the Murrys’ house, and so the group took the trouble to shoot it in a real family’s kitchen. Take the time to find and use the right location.
- The Rule of Thirds. Meg’s face is positioned right where there are two intersections of the lines on our invisible grid. Remember that Rule of Thirds! Framing the shots using it almost always leads to a more pleasing result.
Shot #4: Back to Charles Wallace
- Continuity: Props and costumes shouldn’t appear or disappear midway through a scene. Notice how Charles Wallace is still holding the milk and sandwich as he was in his previous shot. This is called “continuity” and it’s harder to achieve than you might think. What if you are shooting a scene over two days, but your actor ends up wearing a different shirt on those two different days? Or what if you forget on the second day to bring in a prop you used the first day? You don’t want shirts suddenly changing in the middle of a scene, or props appearing and disappearing. Keep track of that.
- 180 Rule and Rule of Thirds. Once again, we’re keeping Charles Wallace on the left and Meg on the right, and Charles Wallace’s head is right smack dab in the intersection of two lines.
Shot #5, Part 1: “Mom, Where’s Dad?”
- Unbalanced Symmetry. Seeing Meg on the left side, and emptiness of the right side, makes us unconsciously want the right side to be filled with something. We call this “unbalanced symmetry.” It creates an expectation that something will soon happen on the right side. And lo and behold, a second later . . .
Shot #5, Part 2: “He’s On Another Planet”
- Balanced Symmetry . . . Mrs. Murry pops her head in the right side, completing the symmetry! Use unbalanced symmetry to create unconscious expectation in viewer’s mind, and then fulfill (or don’t fulfill, depending on your aim) that expectation.
- Depth of Field. Note that Mrs. Murry is further away from the camera than Meg; the window is even further away; and the house beyond the window even FURTHER away. Depth like this makes visually interesting shots. Get your actors away from walls, away from corners, and put them at various distances from the camera. Here’s a classic use of “depth of field” from Citizen Kane.
Shot #5, Part 3: “I Hear Something Outside”

|
- Left-to-right vs. Right-to-left movement. Charles Wallace moves across the frame from left to right. Here’s a weird fact: movement from left-to-right on a screen feels “correct” and “easy” to our eyes, while moving right-to-left feels “wrong” and “difficult.” Often the hero in a movie (or whoever has the initiative/momentum in the scene) moves left-to-right, and villains (or whoever is resisting what is happening, or doing something difficult or “wrong”) move from right-to-left. And that’s not just in movies! Think about video games: in “Super Mario Bros.” and indeed almost all side-scrolling video games, your movement goes from left-to-right and almost never right-to-left. (A similar bias in our minds exists for vertical movement: upward movement onscreen feels “hard,” while downward movement onscreen feels “easy”). So if you want to show a character doing something that you want the audience to feel is impossible, have them moving “uphill” from right-to-left in your shot. If you want to make a movement feel easy or inevitable, have them moving “downhill” from left to right. Using these psychological tricks can add a lot of hidden power to your shots. Here’s a short video that explains this trick further.
- Complicated shots are fun to watch. There were three parts to this shot: Meg asking “Mom, where’s Dad?”, and Mrs. Murry popping in to say “He’s on another planet,” and Charles Wallace crossing left-to-right in front of them saying “I hear something outside.” What could’ve been a humdrum bunch of lines becomes interesting to watch because we took time and care to set up an interesting shot with fulfilled symmetry, depth of field, and character movement that takes advantage of our minds’ inherent biases. Plan your shots creatively!
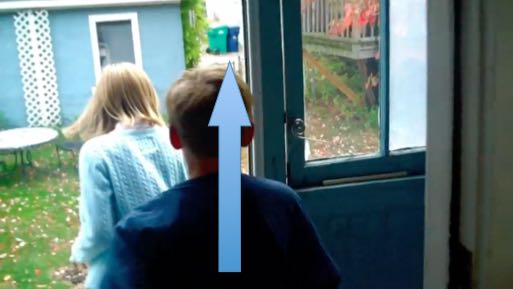
Shot #6: Running Outside
- Background sounds are a powerful tool. An ominous droning noise starts up, making us feel that something supernatural is about to happen. Use background sound to create and manage expectations in the audience.
- Handheld moving camera can give an energetic, immediate feeling. Up until now the camera has stayed still for each shot. Now that we’re entering the world of adventure, we switch for a moment to this jittery, on-the-move shot as we follow Meg and Charles from behind as they go outside. It feels like we’re tagging along on the adventure with them. Use a variety the shots like this to keep the audience engaged!
Shot #7, Part 1: Mrs. Whatsit

|
- Use background sound to link shots together. The rain-and-thunder background sound linked the beginning shots together. Now we’ll use the new droning background noise to link this shot with the previous shot and with subsequent shots. By laying in this background sound over a series of shots, it will cause the audio in all the shots to flow together, without a distracting difference in background noise every time the shot changes.
- Get your camera outside! As much as possible, shoot outside. There is more natural depth to your field. Outside is more interesting to watch than a bunch of boring rooms, especially if they are classrooms or school hallways.
- Costumes are important! All three witches who show up in this shot have elaborate, goofy costumes. We immediately understand that they are weirdo characters and it’s much more fun to watch than if these actors were wearing their ordinary clothes and just acting like witches. Don’t skimp on costumes, they will make your movie.
- Switch up the camera movement. In the last shot the camera was moving forward; now it’s slowly moving backward! Keep switching up the camera movement to add visual interest.
- Give characters fun entrances. We have a big job in this shot: we must introduce three characters, the witches Mrs. Whatsit, Mrs. Who, and Mrs. Which. We’ll do it all in this one shot (which will subtly emphasize that they are all part of the same group). Each witch will pop in from a different direction, with a different characteristic line. First Mrs. Whatsit comes in from below . . .
Shot #7, Part 2: Mrs. Who
- Constantly surprise the audience. . . . Then Mrs. Who comes in! Did you expect a witch to show up in the treehouse, the first time you saw this? Probably not. Put your characters in unusual places, surprise the audience! (Also: just as how, in the original book, Mrs. Who constantly quotes famous thinkers, she quotes Shakespeare here. Have your characters acting in character from the moment we see them.) And as the camera continues to pull out, we see . . .
Shot #7, Part 3: Mrs. Which

|
- Things are funny in threes. . . . finally the third witch Mrs. Which comes swinging in from the side, screeching gleefully (and in character)! This part often gets a reaction or a laugh from the audience. But it wouldn’t be as funny if Mrs. Which swung in as the first witch, or the second witch. We set up a pattern with the first two witches appearing, and then broke that pattern, or fulfilled it in a special way, when the third witch came sailing in.
- Every shot is an opportunity to do something amazing. All we really had to do at this point in the movie was introduce three witches. We could’ve just had them walk on camera and say the same things. But that would’ve been boring. All this camera movement and character movement makes what could’ve been a ho-hum introduction of three minor characters into a highlight of the movie! It costs no extra money to do a shot like this, just a little extra inspiration and planning. You have only 90 seconds to work with, so make every shot interesting!
Shot #8, Part 1: “But what is tessering?”
- Just as before, background noise links shots into a scene. We’ve changed perspective, and so it’s useful that our ominous droning noise continues in the background, explicitly linking this shot to previous shots, so that it all feels like it’s happening in one scene. (Though the droning fades throughout this shot.)
- Rule of Thirds. Meg’s head is positioned right at the intersection of two lines, fulfilling the Rule of Thirds.
- Unbalanced symmetry again! Meg is walking towards the camera, and walking left-to-right, which makes her look like an active hero who is taking the initiative. The camera in turn backs away from her, creating an unbalanced symmetry on the right, which we unconsciously expect to be filled . . .
Shot #8, Part 2: “You see this string? And this insect?”
- The unbalanced becomes balanced! . . . And that empty space is filled by Mrs. Whatsit on the right, when Meg swings around and this becomes an over-the-shoulder shot.
- Props are better than no props. Using props like a string and a bug here keeps up the visual interest and makes it easier to understand what Mrs. Whatsit it talking about. Always introduce props into a scene if you can!
- Rule of Thirds. Check it out: the bug and the string are right on the grid lines, so our eyes are irresistibly drawn to them.
- This single shot is constantly changing. This shot (1) started as a medium shot of Meg, then (2) turned into a shot that was over Meg’s shoulder focused on Mrs. Whatsit, and then (3) Meg interrupts the witch’s explanation, so the shot changes again . . .
Shot #8, Part 3: “Okay, I get it.”
- This single shot is constantly changing. . . . Meg walks away, leaving us alone with Mrs. Whatsit. The camera pushes closer in on Mrs. Whatsit so that now it’s a shot of just her. The lesson? By varying the shot in this complicated way—starting with Meg alone, proceeding to Meg and Mrs. Whatsit together, and ending on Mrs. Whatsit alone—we keep the audience engaged.
- Reaction shots are often what make a joke funny. After Meg interrupts and dismisses Mrs. Whatsit, the shot lingers on the witch for a maybe half-second longer than expected, and that makes the joke land. If you’re wondering how a character should react to a joke, underplaying it (like here) is often funnier than overplaying it. (Mrs. Whatsit’s disappointed little blink also sold it for me.)
Shot #9: “Who’s This Guy?”
- Don’t let characters just fade away. In a scene with many characters in it, we should check in on each of them periodically so remind the viewer that they still exist. We haven’t seen Charles Wallace in a while, so it’s good for the camera to focus on him now to remind us that he’s still in the scene, even if it’s only to remark on the entrance of Calvin.
- What happens if you have an “and then”? In Step 3, I advised that events in a story should be linked by “therefore” (Mrs. Which said “it’s time to tesser,” therefore Meg asked “What is tessering?”) or “but” (Mrs. Whatsit tried to explain tessering, but Meg interrupted her and walked away). But sometimes events happen that aren’t directly related to what happened before, like when Calvin shows up in this movie. So we set it up by having Charles Wallace loudly say “Who’s this guy?” which tips us off that something is about to happen that wasn’t directly caused by anything that came before.
Shot #10, Part 1: Enter Calvin
- Unbalanced symmetry again. Once again, we set up a shot where Meg is on the left and there is an empty space on the right that the viewer unconsciously wants to be filled—which will soon be filled by Calvin.
- Depth of Field. Take advantage of stuff in the background if you can. We put the witches in the background to add visual interest (and because one of them will speak soon).
Shot #10, Part 2: “I’m Calvin O’Keefe”
- Balanced Symmetry. The unbalanced symmetry is now balanced by the arrival of Calvin. It feels to the audience like Calvin automatically “belongs” in the group of friends because he has stepped into an empty place that looks like it had been reserved for him. This is visual storytelling! It’s all done without words!
Shot #10, Part 3: “What’s that?”
- Keep It Moving! Notice that this movie doesn’t lag even once. Every single line pushes the story forward. Even at this emotional high point of Calvin and Meg falling for each other, there’s a crazy sci-fi zapping sound effect and without cutting we swing the camera over to Meg . . .
Shot #10, Part 4: “The universe rrrrriped!”
- Don’t be afraid of elaborate shots. This shot (1) started with an unbalanced symmetry of Meg with the witches in the background, (2) became a balanced symmetry when Calvin stepped in, (3) pushed in on Meg when the crazy noise happened, and now (4) we swing from Meg and push forward toward the witches, and Mrs. Which says the universe has ripped. All in one shot! Again, it doesn’t take money to do a shot like this, just a little planning and creativity. And it’s much more interesting to watch than just a bunch of people blabbing their lines in one long stationary shot. Move the camera around, play with composition!
- The background sound changes again. In the aftermath of the “universe ripping” noise, there is now an alienating “aftermath noise” buzzing along. The background noises are getting weirder and weirder: first a gentle thunderstorm, then an ominous hum, now a nerve-jangling buzz. Increase intensity as we get deeper in the story!
Shot #11: “That’s bad”
- Sound design links shots together. The nerve-jangling buzz continues into this shot, linking it with the previous shot. Don’t underestimate the power of these background noises to set mood and do storytelling work on their own.
- Push in to increase tension. This shot is very similar to our last shot of Charles Wallace. He hasn’t moved. But this shot is framed closer to him. If you make subsequent shots of the same subject closer and closer, that naturally ratchets up the tension. Use that trick!
Shot #12: Hyperspace
- There are many ways to transition from shot to shot. So far, every transition from shot to shot has been a regular cut. But there are many ways to transition from shot to shot: not only a regular cut, but a dissolve, a fade out and then a fade in, a wipe, etc. Here we gradually dissolve from Charles to the “hyperspace” effect to bring us to the alien planet. The hyperspace stars-streaking-past video was downloaded from YouTube. The shot of Charles Wallace dissolves into the hyperspace, and then the hyperspace dissolves into the next shot of the kids on Camazotz. We very effectively feel like we’ve gone a mystical journey through space and time, and it took no money at all!
- Free yourself from the defaults. Some moviemaking software makes it such that every transition is a dissolve by default. That looks terrible! You can change those defaults. Don’t let every transition be the same. Take control of your transitions. Make sure they’re serving the story.
Shot #13: Establishing shot on alien world
- You don’t have to go to an alien planet to be on an alien planet. We’re supposed to be on an alien planet now, but really, the kids just moved from the back yard to the front yard of the same house! It feels “alien” because we tinted the footage using the usual video tools in iMovie. Also, a new, alien-ethereal background noise starts here and goes all throughout the next few shots, linking them together. Background noise is powerful! Use that power!
- Use establishing shots to ground the audience’s expectations. Once again we are “behind” all of our heroes, “following” them into adventure. It wouldn’t have worked so well if our first shot on an alien planet had been a closeup of one of the characters in particular. We want to make it clear immediately that they (and only they, without the witches) have gone to a completely different place together.
Shot #14: Switch to the front view
- Let’s see their faces. The previous shot was an establishing shot where we were “following” our heroes into the new world, so it was okay to see only the backs of their heads. But in general we want our heroes to be facing the camera most of the time, so we can see their faces and register their emotions. That’s what we do here.
- Sound design matters. The alien-ethereal background noise continues, linking this shot to the previous shot.
- Rule of Thirds. Calvin is exactly at the intersection of two lines, which makes sense because he’s doing the talking here.
- Initiating a visual rhythm. In the previous shot, we saw this group from the back. In this shot, we see them from the front. In the next shot, we’ll see them from the back again. We’re establishing a rhythm that will pay off a few shots from now.
Shot #15: Enter the basketball boy!
- Establishing a visual rhythm. We see our heroes from the back again, but closer. We’ve set up a pattern, going back and forth, ahead and behind this stationary group, getting closer every time. When this pattern is finally “broken” we will feel “relief.”
- Sound design. The alien-ethereal background noise continues, linking this shot to the shots before and after it.
- Rule of Thirds. Notice Meg and Charles are exactly at the intersections!
Shot #16: Confrontation with basketball boy
- Intensifying the pattern. The pattern we established continues and escalates! We alternate back to seeing our group of heroes from the front again, but closer. The viewer develops an unconscious expectation: how will this pattern of shots be broken?
Shot #17: “I’m just playing basketball”
- Pattern intensifies even more. We’ve set up a pattern where we go back and forth between looking at the kids and looking at the basketball boy, with each subsequent shot closer to its subject. We’ve moved so close to the basketball boy that we’ve gone over the shoulders of our heroes.
Shot #18: “Whatever, robot”
- Breaking the pattern (visual). Our heroes break the pattern of alternating shots by MOVING (left to right, of course, and towards the camera, which makes them look like they’re dominant and in control), which destroys the distance between them and the robot boy. Also notice that our heroes are already moving when this shot has started. To see them move is a relief after they’ve been stationary for so long.
- Breaking the pattern (audio). The alien-ethereal background noise ABRUPTLY STOPS (because we’re breaking the pattern). The combination of all these choices makes Calvin’s dismissive “Whatever, robot” line work all the better. (Also, it’s satisfying to see Calvin physically shove the “robot” out of the way. It’s powerful when characters touch.)
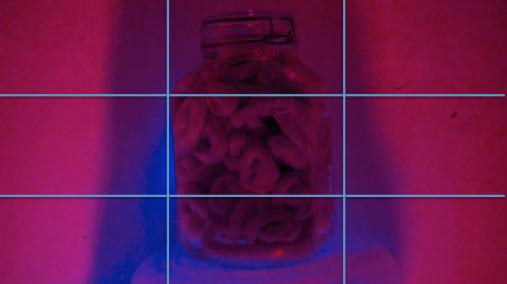
Shot #19: Entering IT’s lair

|
- Background sound and adjusting the color are powerful tools! A new throbbing background noise begins and and a new reddish color tints the scene (both available through free tools in iMovie). This signals to the audience that we’re in a totally new environment from the last scene. (In actuality, we’re just in the basement of the same house where we’ve shot the rest of the movie.)
- Vary the direction of movement. In the last shot our heroes were walking towards the camera; now they’re walking away from it. Alternate motions like this to keep it visually interesting.
- Special effects don’t have to be difficult or expensive. That “brain in a jar” is just some wadded-up foam tubing stuffed in a glass jar full of water. Nothing fancy, just stuff you can find sitting around the house.
- Arouse the audience’s curiosity. The audience’s curiosity is aroused by watching the children approach the weird distant thing in the center of the frame. We also feel drawn to it because we’ve put the jar in the corner, and we’re walking towards that corner, so it feels like the whole universe is slanting towards this thing. What could that thing be . . . ?
Shot #20: IT
- Sound design. The crackling background zapping throbs continue, linking this with the previous and subsequent shots.
- The camera is caught up with the momentum of our heroes. Just as our heroes were drawing closer to the brain, so our camera is drawing closer to it too, satisfying the curiosity from the last shot.
Shot #21, Part 1: “Hi, Dad!”
- Through camera movement, the audience can “discover” things at the same time as the heroes. As Meg whirls around to notice something hitherto unseen behind her, the camera pans to the right to show us too. By having the camera pan in this way, we “discover” who is behind Meg at the same time she does . . .
Shot #21, Part 2: “I’m not going to solve any of your problems”
- Rule of Thirds. Mr. Murry’s face is smack dab at the gridline intersection!
- Costume matters. With just a few easy costume choices (suit, book) we visually convey that Mr. Murry is a professorial type, just as in original story. This is effective visual storytelling, with not a word used! And not expensive either.
- The “low angle” shot. By tilting the camera UP at Mr. Murry, he looks older and more dominant compared to Meg.
Shot #22: “You’ll never get your brother back”
- Push in closer in subsequent shots to increase tension. Every time the movie cuts back to the brain-in-a-jar, the camera has drawn closer to it. This increases tension in a subtle way, perhaps without the audience even consciously noticing! But they will feel it.
Shot #23: “But what about the power of love?”
- Watch the face! Meg starts the shot with her chin tucked, so we’re “looking down” at her (she is the underdog) but she ends the shot with her chin up, so we’re “looking up” at her (she has become dominant). This nonverbally signals that she has “won.”
- Don’t be afraid of closeups! This shot only works because it’s a closeup on Meg’s face. Don’t be afraid to push your camera close into the actor’s faces! The more of their faces we can see, the more we can register their emotions. The worst thing to do is have too many scenes where the actors are faced away from the camera, and all we see is the backs of their heads.
Shot #24: “I never thought of that”
- You can communicate plot information with sound design. As the brain in the jar “IT” falters, the background throbs and zaps also falter . . . and a bizarre new noise bloops up, signaling that something truly has changed. Use sound effects to convey plot information or convey emotions nonverbally!
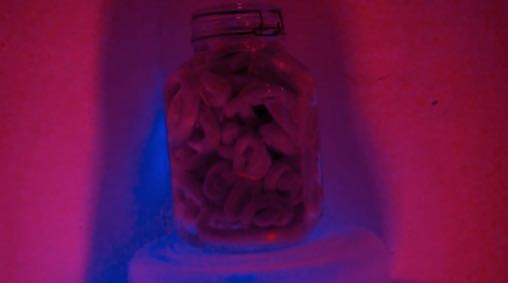
Shot #25: The destruction of IT

|
- Tell the story through action, images, and sound, not words. The evil droning and crackling sounds stop. The ominous red tint turns back to normal lightning. The glass shatters on the floor and the brain flops out. We don’t need to be told verbally that Meg has defeated this brain in a jar, because we’ve watched it happen, underscored by choices in visual design and sound design. This is much more powerful than someone saying “I won!” or someone else saying “I lost.” What we see and hear goes straight to the most fundamental parts of our brains, and is much more convincing than words people say.
- Don’t be afraid to gross ’em out. And break some stuff along the way! Often when this movie is shown, it gets a shuddering “yuck” reaction from the audience at this point. Don’t be afraid to gross the audience out a little! It makes for a memorable movie! If the end of A Wrinkle in Time has a giant disembodied brain being defeated, let’s see that brain writhe and suffer! (Also: people love watching things break. The shattering of the glass jar is satisfying for audiences as well. Go ahead and break some things to make your movie, it’ll probably be worth it.)
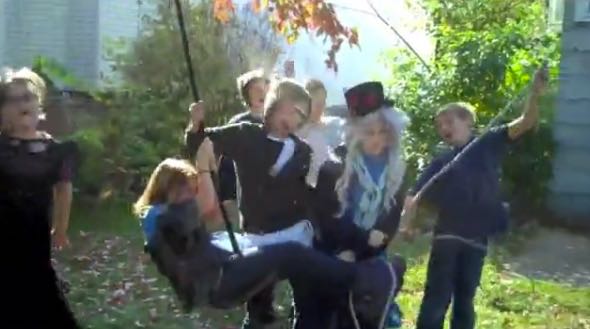
Shot #26: Dance Party Credits Sequence
- Go out on a high note! Ending the movie on a shattered glass jar and a dying brain would be abrupt and unsatisfying. This movie brings everyone out at the end for a crazy dance party over the ending credits. It feels satisfying to see all the characters again one last time, goofing off. This credit sequence does go a bit long, and at actual film screenings I might cut off your credits sequence to make room for other movies. But go ahead and have fun with yours.
- Make the first shot and the last shot be opposites, to show how the story has changed the hero. Our first shot of this movie was a miserable Meg all alone, indoors, while it was raining. This final shot is a happy Meg with tons of friends, outdoors, on a sunny day. If you make the last shot the complete opposite of the first shot, it shows the progress the hero has made, and the way the world has changed through the action of the story. It’s a very satisfying technique to use.
And so concludes Part 4 of “How To Make A 90-Second Newbery.” (Here are Part 1, Part 2, and Part 3.) In the next post, we’ll look at easy-to-use editing tricks that can make your movie look great.